Last updated 6/12/23
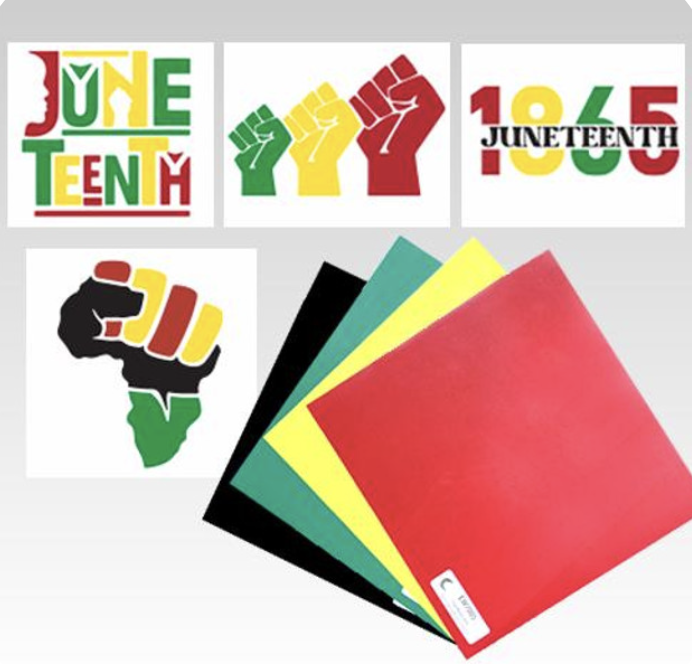
Are you looking for the perfect way to commemorate Juneteenth? Heat Transfer Warehouse was, which is why we created this Juneteenth HTV and SVG Bundle! It includes 4 SVG files and one sheet each of red, yellow, green, and black Siser EasyWeed. With this bundle, you will have everything you need to create personalized, hats, bags, and more. Plus, it’s an affordable way to show your support for the cause while showing off your creativity and having some fun in the process! Below, we will show you a suggestion for how to put this wonderful little bundle to use:
Equipment/Materials Used
- Silhouette Cameo 4
- HTW 16x20 Auto Open
- Juneteenth SVG Bundle
- District® Muscle Tank
- Port Authority® Document Tote
Steps
Muscle Tank
Step 1:
Download the SVG files from your account! (You can access these by going into your order history and clicking on the bundle order, then select "download.")
Step 2:
Cut the heat transfer vinyl using a vinyl cutter of your choice. Remember to mirror the design in your design software. For this design, we used our Silhouette Cameo.

Step 3:
Weed out the excess vinyl from your sheet. We typically trim our sheet before weeding so we can save the scraps for future projects.
Step 4:
We chose to put our first design on a District tank top, so we warmed up our heat press to 305 F and did a 3 second pre-press on it to smooth out any wrinkles and remove moisture. Then we lined up the first layer of the Juneteenth raised fists design (EasyWeed Green). We pressed this layer for a one second tack, then did a hot peel to reveal the pressed layer!

Step 5:
After we pressed the first layer, we lined up the second layer (EasyWeed Yellow). Then, we double checked the SVG file to make sure the fists were aligned correctly. We pressed this layer for a one second tack, then peeled the liner off while it was hot.
Note: If you don’t have an upper platen cover, you will want to use a heat press sheet to protect the layer of HTV that is already on the garment.

Step 6:
Next, we lined up our third layer of the design (EasyWeed Red). After making sure it was lined up, we pressed it for the full 10 seconds since it was the last layer. When the time was up, we peeled the liner hot...and the muscle tank was finished! Here is a closeup of how it turned out:

Tote Bag
Step 1:
We chose to put our second design on a tote bag! To start, we lined up the first layer of the Juneteenth design the (EasyWeed Red). We pressed this layer for a short one second tack, then peeled off the liner while it was hot to expose the pressed layer.

Step 2:
After pressing the first layer, we lined up the second layer (EasyWeed Green). We pressed this layer for a one second tack, then peeled the liner hot.

Step 3:
Next, we lined up our third layer of this design (EasyWeed Yellow). After making sure it was lined up, we pressed it for 10 seconds. After the 10 seconds was finished, we peeled the liner to reveal our completed tote bag (as seen below)!

Here are the finished products!

For more bundle options, make sure you check out our page full of SVG Artwork! You can also find some more Juneteenth transfers (and other related products) on our Juneteenth landing page! Take, for example, these Supacolor Transfers: