
Layering htv can seem like a daunting task, but it is way easier than it seems! The one thing you need to make sure you check before pressing, is the description in the website to see if we do or don’t recommend layering that specific htv. In this blog, we will go over what you will need for layering htv, the process of layering onto a duffel bag, and talk about some heat transfer vinyl that can or can’t be layered.
Supplies:
Heat Press Sheets or Heat Press Covers

Heat press sheets a very valuable resource to have when you are layering htv. They help a lot when you are tacking your vinyl to the garment. They give protection to the previously applied layer from re-pressing (pressing a second time) when applying a new layer!

Heat press pillows help get equal amounts of pressure across the garment if you are pressing an uneven surface.

Heat press rulers help get an even placement of your transfer. These rulers are beneficial for pressing one layer of vinyl and can be a lifesaver when it comes to multiple layers, because that is even more difficult to line everything up!
Process:
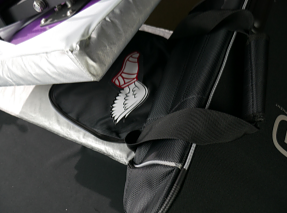
First, you should adjust your pressure to make sure you are getting enough! Use a heat press pillow if you are pressing an uneven surface like we are here with our duffel bag We pressed on the flap of the bag. We used our 15x15 HTW Drawer Clamshell for this project.

When we put the first layer down, we used our heat press ruler to make sure the design was centered, then pressed our vinyl. When layering Siser Easyweed like we are using here, you should do a 1 second tack for all layers. You will always do a tack when layering htv, but for other vinyl we recommend a 3 second tack. After each layer has been tacked to your garment, you will then press for the full amount of time recommended in the application instructions.

When doing the second layer, make sure it is lined up how you want it with the first layer. After placing the layer on the bag, we pressed the layers for another 1 second to tack the vinyl down, then peeled warm.
The more layers you have, the trickier it might be to line up correctly. We find it really helpful to pull up the design on your computer, so you can reference the artwork when arranging your layers.

For our final layer we pressed the entire design for 10 seconds. In total, we did 3 layers of Siser Easyweed for this design, with the addition of the last name below the design.
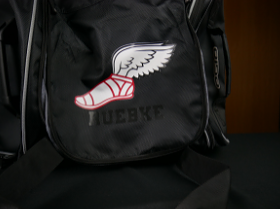
We used black htv for the name as a discreet way to identify the bag while travelling. It is subtle enough to provide privacy, while still being visible!
Siser Easyweed is a great htv for layering. Here is our list of other vinyl we recommend for layering:
Thermoflex Turbo Low Temp (except neon and metallics)
If you are questioning if your vinyl can or can’t be layered, always check the description on our website. Layering htv is a lot more doable than most people think, and can enhance the look of your design if used correctly! When layering vinyl, remember you don’t want too many layers stacked on top of each other because that can really weigh down the garment. We suggest no more than 3 layers directly on top of each other so the transfer doesn’t seem too bulky. The bigger the design, the less layering we suggest as it can make your design too heavy.
For more information about layering htv, check out this blog or this YouTube video: