 Custom Printed Apparel
 Custom DTF Apparel
 Embroidered Apparel
 Full Service Customization
 Rhinestone Apparel
 Sublimated Apparel
 Custom Drinkware/Photo Panels
 Siser Sanmar Decoration
 Seasonal Items
 DTF Transfers
 Supacolor Transfers
 Sublimation Transfers
 HTV Transfers
 Custom Patches, Stickers, & Magnets
 Custom Screen Print Transfers
 Artwork & Services
 Custom Banners
For those of you who are new to using Heat Transfer Vinyl, we understand the overwhelming struggles of getting your first vinyl cutting machine! In fact, getting started with the Silhouette Cameo 3 can appear to be quite intimidating, and even stressful. In this blog, we are going to walk you through how to set up your Silhouette Cameo 3 and show you how to begin your first cut!
Also, make sure to check out our Silhouette Cameo Kits - they inlcude over $260 worth of free material!
Setting Up The Silhouette Cameo 3
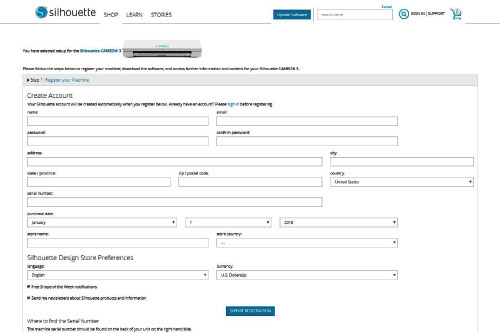
1) First, to find the software download, user guide, and free content/subscription for the Silhouette Cameo 3 12” cutter, visit: www.silhouetteamerica.com/setup. You will find the serial number on the back of your Cameo with a barcode (you will need this to register your machine). Overall, the setup is super easy as long as you follow the simple steps provided in the link. Also, the Silhouette Studio Software is FREE!
2) You will also always want to ensure that the firmware on your machine is up-to-date. To download the latest versions of firmware for your machine, simply visit: https://www.silhouetteamerica.com/firmware
3) Now, let’s take a closer look at actual components of the machine.
4) On the right side of your Cameo, you will find the power button along with the ports for USB Drive, USB 2.0 cord and the Power cord. It is also Bluetooth compatible (setup directions are provided in the setup link provided above)!

5) Also towards the right side of your machine, there is a LCD touchscreen that is very easy-to-read and simple to use.

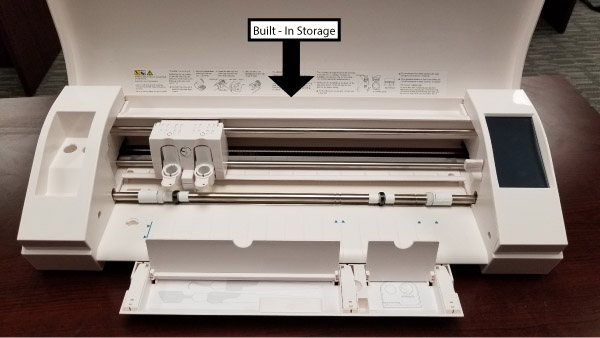
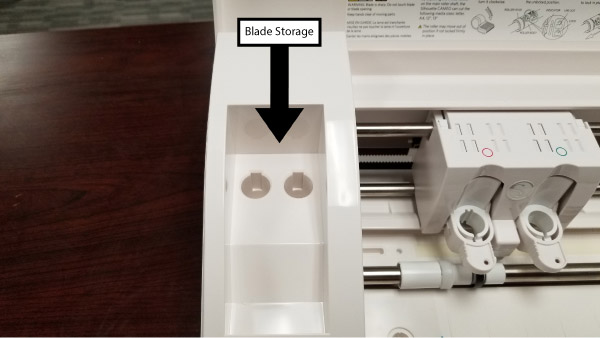
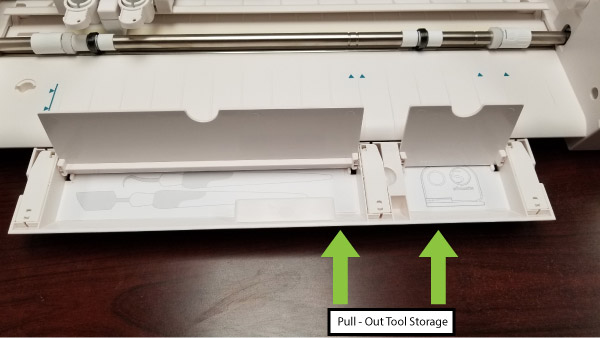
6) The Cameo 3 conveniently includes 4 different compartments for you to store your blades and tools.
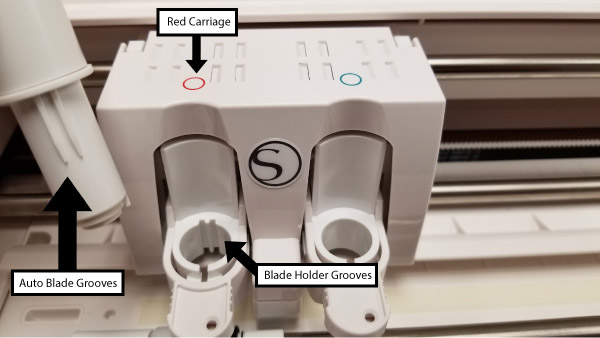
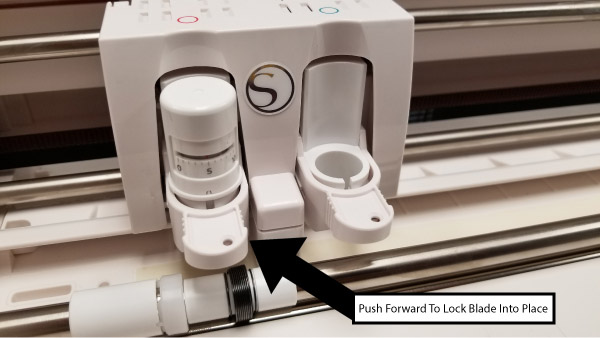
7) Now, let’s take a look at the Blade and Pen Holders. The Cameo 3 Auto Blade must be placed in the red carriage, which in this case is on the left. Place it in the opening and ensure that the grooves on the back align with the grooves in the Blade Holder. Also, make sure that it’s pressed down completely. Then, push the locking piece forward all the way until it clicks into place.
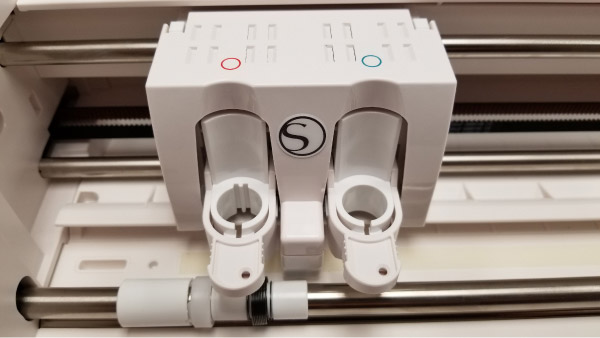
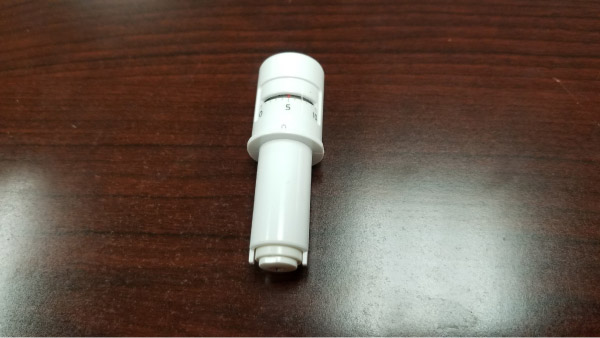
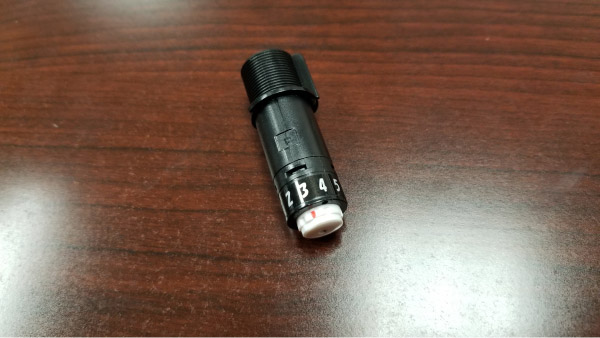
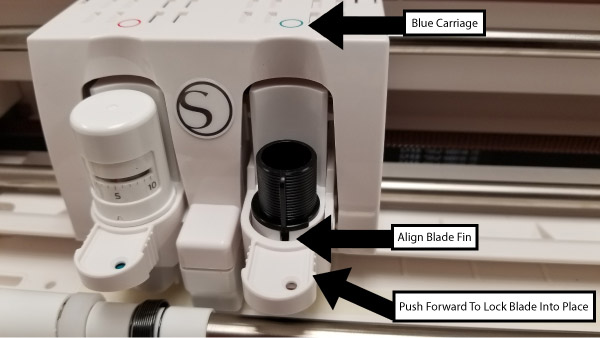
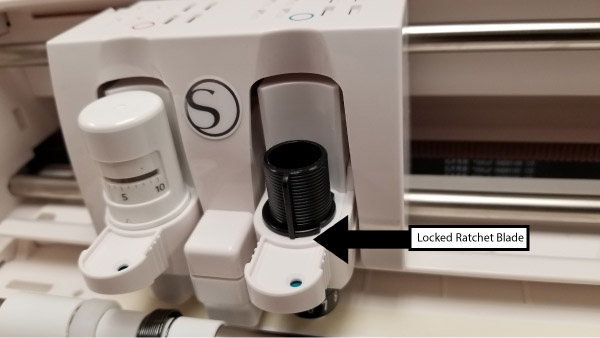
8) The black Ratchet Blade (manual blade) can be placed in either the red or blue carriage. As you can see, we have it in the blue carriage on the right side. There is a fin on this blade - make sure it is facing forward to align with the slit in the Blade Holder. Just like with the Auto Blade, ensure that this is pressed down completely. Then, push the locking piece forward all the way until it clicks into place.
9) The big shiny silver rod in the middle is the Roller Bar, which is attached to the Rollers in which your vinyl will be placed under.
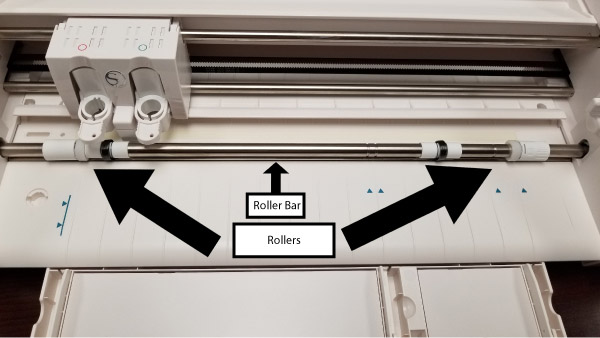
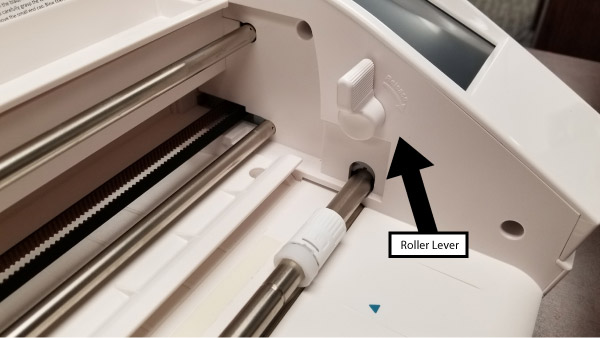
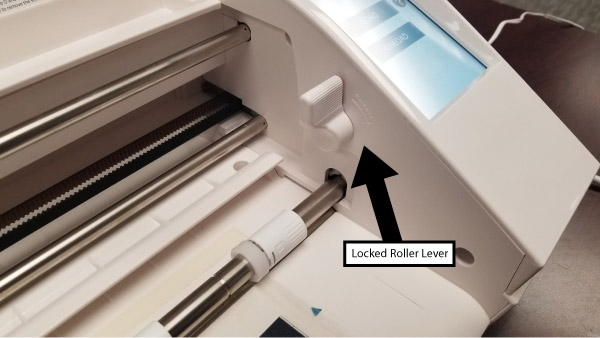
10) To the right of the Roller Bar is the Roller Lever to raise and lower the Roller Bar.
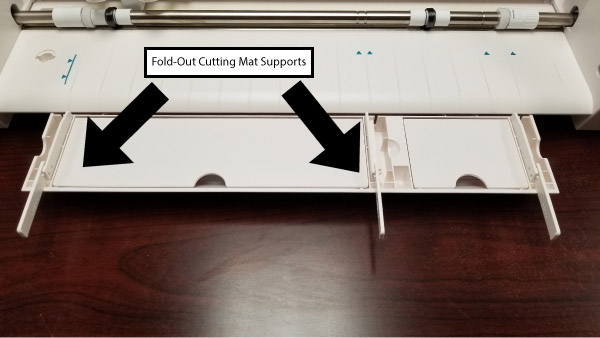
11) Your Cameo 3 will always include a cutting mat. The purpose of the cutting mat is to hold your vinyl in place while cutting (we will show you how to use this below).
12) Also, to help with the cutting mat, the Cameo includes fold-out mat supports.
Cutting HTV With The Silhouette Cameo 3
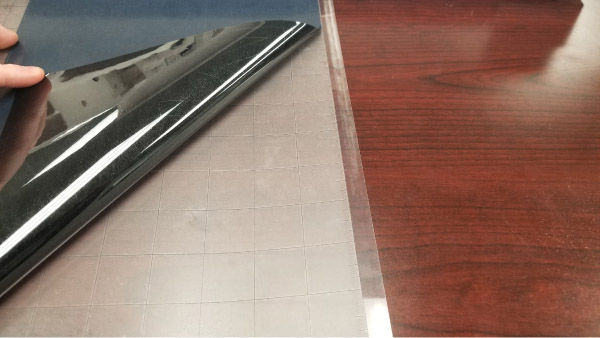
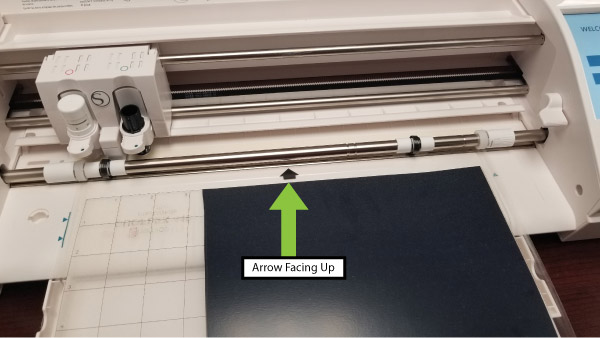
1) After having your design created in Silhouette Studio, you are going to want to turn on your Cameo and get your cutting mat out. As mentioned above, you can use the fold-out mat supports if you wish. With the cutting mat, you will see a teal colored protective covering. Peel this cover off to expose the sticky side of the mat. Then, with the arrow on the mat facing upwards, place your HTV on the mat with the shiny side down. You will see that our sheet of HTV is smaller than the cutting mat. We aligned our sheet on the right side of the mat (we will explain later why we did this). There is a blue line on the left-side of Cameo to help you align this cutting mat. Place the mat so that the left edge is lined up with the blue line and the top edge just slightly touching the silver roller bar.

2) While adjusting the cutting mat into the machine, make sure that the Roller Lever is facing towards you. When the mat is fully situated, lift the Roller Lever up to lock the cutting mat into place under the Roller Bars.
3) Once you have locked the cutting mat into place (with your HTV on it of course), you will see that on the touchscreen you will be given the option to either load or unload. If you feel as if your mat has been aligned straight, proceed to load. You will then see the Roller Bars grab the edge of the cutting mat to bring your vinyl under the Blade Holders.

4) You are almost ready to cut! Make sure that your design is completed in Silhouette Studio and that it is sized correctly to fit on your vinyl.

5) In Silhouette Studio, click on “SEND” in the upper right hand-corner. You will see that there is a drop-down menu under the Red Carriage, labeled “Tool 1” and a drop-down menu under the Blue Carriage, labeled “Tool 2”. We personally recommend using the Auto Blade, which only fits in the Red Carriage “Tool 1”.
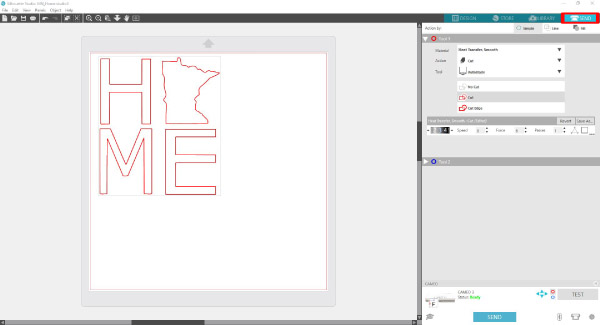
6) Under the “Application Instructions” tab within most product pages on our website, you will find the cutting instructions for the Cameo. For this cutting demo, we used Siser EasyWeed. In this case, you will want to use the Smooth Heat Transfer Material setting, your blade at 3, a speed of 8 and a force of 6. You will also want to click on “cut” as outlined in red.

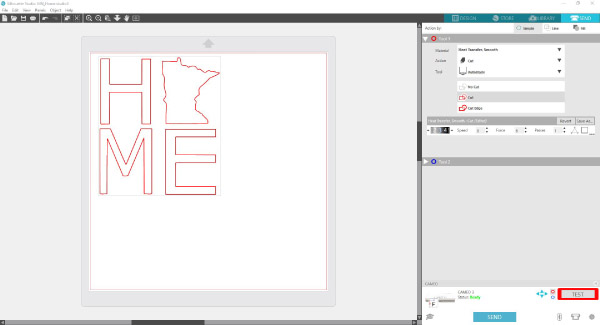
7) We highly recommend doing a test cut before cutting your actual design. To do a test cut, simply click on “Test” in the lower right-hand corner. Make sure you are doing a test cut for the Red Carriage Blade Holder. Your machine should default to this option. When you do a test cut, it will simply cut out a small square with a triangle in the middle in the upper right-hand corner of your vinyl. It is recommended that you attempt to weed the square around the triangle before you begin your actual cutting. This will help ensure that your cut setting are correct. (We used a different color of Siser EasyWeed to perform this test cut)

8) Adjust your cut settings as necessary until the test cut enables your vinyl to weed as it should. Then, reload your vinyl and press send. When you press “SEND” it will ask you if you want to mirror your image. When cutting HTV, you will always want to cut your image mirrored. However, if you allow Silhouette Studio to mirror your image, it will align your design starting the upper left-hand corner (assuming your design is aligned in the upper right-hand corner as shown in Silhouette Studio). This is why we aligned our HTV on the left-hand side of the cutting mat. If your HTV is as big as your cutting mat, this shouldn’t matter. But, to avoid this from occurring, you can manually mirror your image by right clicking on your design and choosing “Flip Horizontally”. By doing this, you will have control as to where your cutting alignment begins on your vinyl.
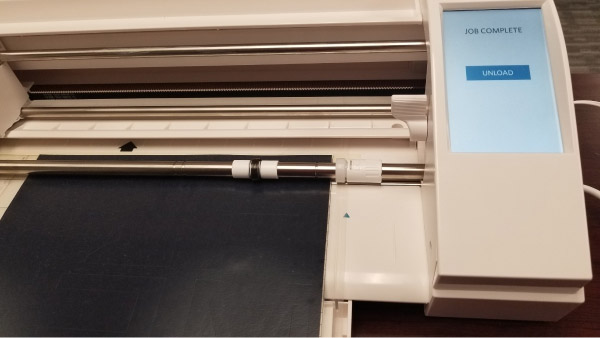
9) When the machine has completed cutting your HTV, you will need to click on “UNLOAD” on the touchscreen and release the Roller Lever to take your vinyl and cutting mat out from under the Roller Bar.
10) Finally, you will need to separate your cut HTV from the cutting mat. To do this, slowly peel back a corner of your HTV in a smooth motion.