
Heat transfer vinyl is the ultimate DIY superpower, but even pros have "failed" shirts in their scrap pile. To keep your projects looking professional and your sanity intact, steer clear of these five common pitfalls.
1. The "Mirror" Check
The #1 cause of wasted vinyl is forgetting to flip the design. Since you cut on the backside of HTV, a non-mirrored design will end up backward once it's on your shirt.
-
The Fix: Before hitting "Go," look for the Mirror toggle in your software.
-
Pro Tip: Tape a small sign to your machine that says "IS IT MIRRORED?" You’ll thank yourself later.
2. Dial in Your "The Big Three"
Adhesion is all about the perfect marriage of Temperature, Pressure, and Time. If even one is off, your vinyl might peel in the wash or (in the case of Puff HTV) fail to rise.
-
The Fix: Don’t guess! Every material has a "sweet spot."
-
Action Item: Keep our [Application Settings Guide] bookmarked. If it says 305°F for 15 seconds with medium pressure, stick to it exactly.
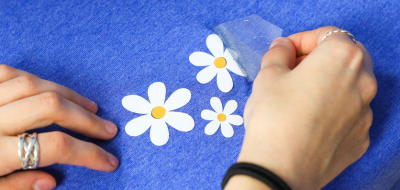
3. Master the "Peel"
Peeling the clear carrier sheet is the most satisfying part, but timing is everything.
-
Hot Peel: Peel immediately while the vinyl is still hot.
-
Cold Peel: Wait until the garment is completely cool to the touch.
-
The Fix: Peeling a "Cold Peel" vinyl while it's hot can pull the design right off the fabric. Always check the instructions for your specific brand.
4. The "Tack-and-Go" Layering Method
When layering multiple colors, the biggest mistake is pressing every layer for the full 15 seconds. By the time you get to layer four, the first layer has been "cooked" for a minute and will likely shrink or distort.
-
The Fix: Use the 1-Second Tack. Press your first layers for just 1 second—just enough to get the carrier sheet off. Only the very last layer gets the full 15-second press to seal the whole "sandwich" together.

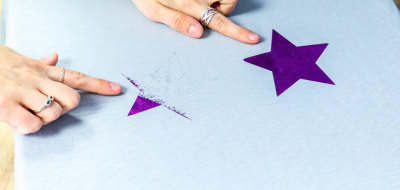
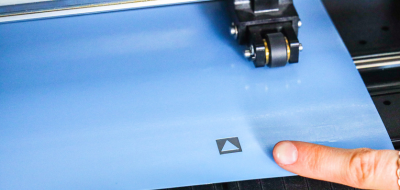
5. Respect the Test Cut
Every roll of vinyl is a little different, and blades wear down over time. Skipping a test cut is a gamble that usually ends with "weeding nightmares."
-
The Fix: Cut a small triangle inside a circle in the corner of your scrap.
-
Success looks like: The blade cuts the vinyl cleanly but leaves the clear carrier sheet completely untouched.
Ready to create?
Avoiding these mistakes turns a stressful project into a fun one. With a little preparation and our HTV Calculator, you’ll have professional results every time.