 Custom Printed Apparel
 Custom DTF Apparel
 Embroidered Apparel
 Full Service Customization
 Rhinestone Apparel
 Sublimated Apparel
 Custom Drinkware/Photo Panels
 Siser Sanmar Decoration
 Seasonal Items
 DTF Transfers
 Supacolor Transfers
 Sublimation Transfers
 HTV Transfers
 Custom Patches
 Custom Stickers
 Artwork & Services
 Twill Transfers

Mastering Multi-Color HTV Designs: Techniques and Troubleshooting
Posted by Shawn Mosch on Oct 31st 2023
Mastering Multi-Color HTV Designs: Techniques and Troubleshooting
If you want to learn how to take your heat transfer vinyl designs to the next level, you might want to learn to create multi-color HTV designs. You could start out with a multi-color SVG file so that the colors and layers are already set up for you, but what if you can only find a single color SVG of the design you want? In this article, I will show you how I learned to master multi-color heat transfer designs with my Cricut!
How to Prepare Multi-Color HTV Designs
First, we need a multi-color design, but sometimes all you can find is a single color image or design. Did you know that you can create layers for multi-color HTV designs in Cricut Design Space? You can do that with the Duplicate and Contour features.
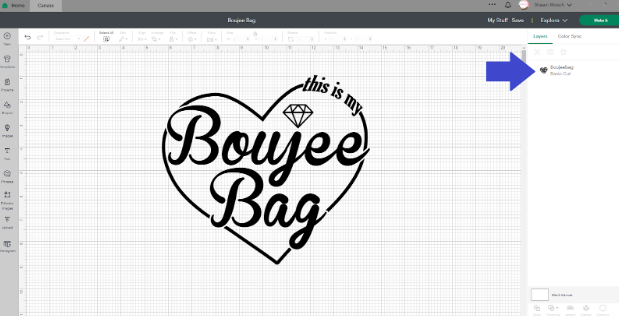
The image below shows a design that only has one single layer for all of the elements in the design. If you look to the right side, in the Layers Panel, you can see that there is only one element shown there. This means that everything in this design is all on the same layer.
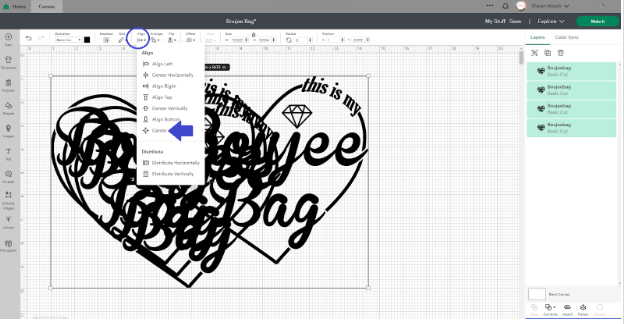
For this example, we are going to create three additional layers for this design. There are two ways to do this. You can either right click on the design and choose Duplicate from the pull down, or you can click the Duplicate button at the top of the Layers Panel. Continue to use Duplicate until you have a total of four layers.
Select all four layers at the same time, then from the top panel use the Align tool and choose the Center option to perfectly line all of these layers up on top of each other. I have the Align function circled in blue in the image below.
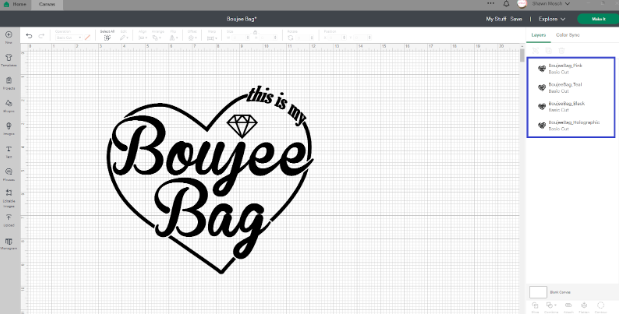
The next step is just to help us keep our multi-color HTV designs organized. We are going to rename each of the layers to include the color we will be cutting that layer from. To change the name of the layer, just double click on the layer name. For mine, I added an underscore and the color name to the end of each layer name.
When you click on just one layer from the Layers Panel, you will see a small eyeball icon to the right of the layer name. You can use that to turn on and off layers. In the next image you can see the eyeball icons, and that the Teal, Black and Holographic layers all have a line through the eyeball, indicating that they are turned off.
Using the Layers Panel and these eyeball icons can help you to make sure you are working with the correct layer.
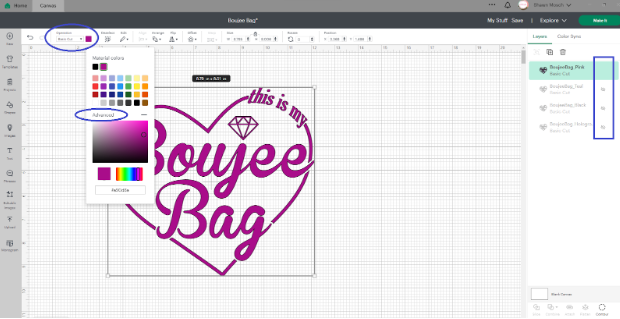
Next I am going to go to the top panel, and next to the Operation there is a square. When you click on that square it allows you to open up the color palette. If you click on the word Advanced within the color palette you can then choose from a wider array of colors. I am using a bright pink for my design.
Now we are going to turn off, or hide, all of the pieces of this design that we do not want to be pink. To do this, click on the Contour button in the lower right corner of the screen. I have it indicated with a blue arrow in the image below.
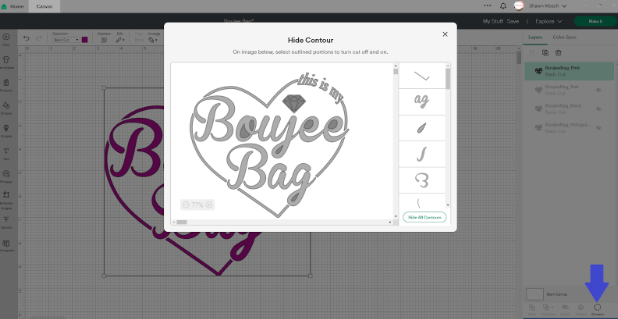
When you click Contour, new window will pop up for you to click on elements to turn them off. When they are off, they will not cut. You can either click on the elements in the main window of this Contour pop up, or from the smaller side panel within the pop up. Remember, whatever you click on will turn off and be hidden.
For my design I want the outline of the heart and the words this is my to be pink, so I will be turning off everything else. Once I am done, my design will look like the image below.
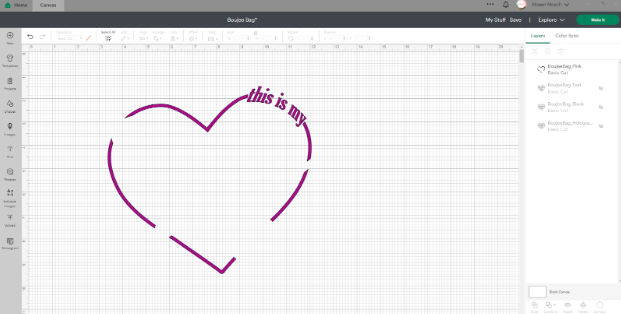
Now your pink layer is ready! You can click on the eyeball icon to turn that off, and then turn on the next color in your design. Repeat the same steps for each color in your multi-color HTV design. Once you have all of the different layers Contoured they way you would like them, you can click on the eyeball icons to turn them all back on.
When I turned all of my layers on, I noticed that the layer that I wanted to be holographic for the inside of the diamond was not showing up. There is an easy fix for that! Go to the Layers Panel and click on the Black layer. If you followed along and changed the names of the layers, it will be easy to locate the Black layer. I have it indicated with a blue arrow in the image below.
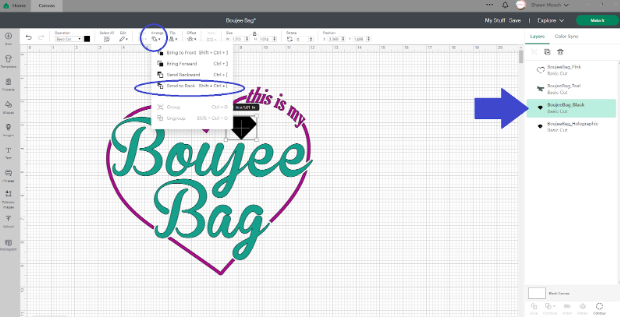
With the Black layer selected, go to the top of the screen and click on the word Arrange, then choose Sent to Back. This will move the Black layer to the back of the design, making the holographic layer visible.
Now your multi-color HTV design is complete! You can now click Make It and proceed to cutting all four of the different colored layers. Make sure to remember to mirror your designs since you are cutting from heat transfer vinyl.
Pressing Tips and Techniques for Multi-Color HTV Designs
I recommend using the same brand of vinyl for all of the colors in your multi-color HTV designs. Different brands and different types of vinyl will have slightly different heat and pressure requirements. By choosing colors of the same brand, you can help eliminate the need to change the temperature on your heat press.
I also recommend having a high quality heat press when working on multi-color HTV designs. This will help to ensure that you are applying the needed pressure to produce a better finished project.
Before you start pressing, look at your design and determine which color covers the most surface area, then use that one as your first layer. This will allow you to more easily position and center your design. You will only need to press the first layer for a short amount of time. I would go about a fourth of the recommended time. You really just need enough time for the HTV to stick to the fabric. This layer will get more heat applied to it when you press the following layers.
Additionally, before you start pressing, make sure that any specialty vinyl will be the last layer that you press. You do not want to over-press or overheat a specialty vinyl like flock, puff, glitter or holographic vinyl. For this design I ended up pressing the teal color first since that allowed me to make sure my lettering was straight and centered on the bag. I was going to start with the pink, but since the heart is slightly tilted it was proving to be troublesome to start with that layer.
Make sure to verify if your vinyl is a hot peel or a cool peel vinyl. Peel slowly, and if any part of the HTV doesn't adhere properly, repress it with a cover sheet for a few more seconds. Now you can slowly peel away the carrier sheet to check your design again.
Once you have the carrier sheet removed, allow your design to cool down. This is important to do between each layer. If you placed the next layer onto your design while the first layer was still hot, then when you put it back in the press that first layer may melt slightly.
For the next color layer, place it on the previously pressed layer. Use a Teflon or parchment paper to protect the previously pressed HTV from direct heat. When applying the last layer, your final press will be for the full recommended time, with a Teflon or parchment paper over the top. This will ensure everything is securely adhered.
Caring for your Multi-Color HTV Designs
After pressing, it's essential to let the HTV design cool for at least 24 hours before washing. When washing, turn the garment inside out and use a gentle cycle. Avoid using bleach or harsh detergents, as they can damage the HTV.
About the Author:
Shawn Mosch blogs about Cricut, vinyl, and design on shawnmosch.com. Click here to purchase and download this SVG. Watch video instructions on Shawn Mosch channel! Click here!